10 Crochet Headband Ideas
Introduction
Crochet headbands are a practical and creative way to combine handmade fashion with everyday functionality. This Pinterest topic focuses on simple DIY projects that allow individuals to create stylish accessories using basic crochet techniques. Headbands are widely used for keeping hair in place while also serving as decorative elements in personal styling. They are suitable for different seasons and can be adapted to match various outfits. This article presents clear and structured ideas that guide readers through the process of creating crochet headbands with precision and consistency.
Readers will learn how to apply step by step methods to produce headbands that are both functional and visually appealing. Each idea emphasizes beginner friendly techniques, accessible materials, and efficient planning. The designs reflect modern design trends and minimalist style preferences while maintaining practicality. These crochet projects are useful for personal use or as handmade gifts. By following these creative ideas, readers can develop skills in crochet while producing items that support both organization and aesthetic styling.
Why This Idea Is Trending or Useful
Crochet headbands are trending as Pinterest ideas because they combine creativity with practicality. Many individuals are interested in DIY projects that produce useful items without requiring complex tools or expensive materials. Crochet headbands meet this need by offering simple techniques that result in wearable accessories. This makes them suitable for beginners who want to start a creative project with clear outcomes.
The appeal also comes from the ability to customize designs. Different colors, textures, and patterns can be used to create unique results. This aligns with modern design preferences that emphasize individuality and handmade decoration. Crochet headbands also support sustainable practices by encouraging reuse of materials and reducing reliance on mass-produced items. Their compact size makes them quick to complete, which adds to their popularity. The combination of accessibility, creativity, and practical value ensures that crochet headbands remain a consistent trend in home decor and fashion-related content.
Materials and Preparation
Preparing for a crochet headband project requires a few essential materials and tools. Common materials include yarn, a crochet hook, scissors, and a measuring tape. The choice of yarn affects the texture and durability of the headband, so it should be selected based on the desired outcome. Tools such as stitch markers may also be useful for maintaining accuracy during the process. Preparation begins with selecting a pattern or design that matches skill level and purpose.
Planning is an important step in achieving consistent results. Measure the head circumference to ensure proper fit. Choose a stitch pattern that aligns with the desired style, whether simple or textured. Preparing the yarn by untangling and organizing it improves workflow. Understanding basic crochet stitches is essential for beginners. A clear step by step approach helps maintain accuracy and efficiency. Proper preparation ensures that the project progresses smoothly and results in a well-structured and durable headband.
Idea 1: Basic Single Crochet Headband
How to Create

A basic single crochet headband is one of the most beginner friendly designs. It uses simple stitches to create a smooth and structured band. This design focuses on consistency and even tension, making it suitable for those new to crochet. The result is a clean and minimalist accessory that can be used in everyday styling.
To create this headband, start by chaining stitches to match the desired length based on head measurements. Work single crochet stitches across each row, maintaining even spacing. Continue until the desired width is achieved. Join the ends securely using a slip stitch or sewing method. This step by step process creates a durable and functional headband.
Idea 2: Twisted Crochet Headband
Step-by-Step Guide

A twisted crochet headband adds a simple design element that enhances visual appeal. The twist creates a focal point while maintaining functionality. This style is commonly used in modern design due to its clean and structured appearance.
Begin by crocheting a rectangular band using basic stitches. Once completed, twist the center before joining the ends. Secure the twist by stitching it in place. Ensure the fit is comfortable and stable. This method creates a stylish and practical accessory.
Idea 3: Ribbed Crochet Headband
How to Make
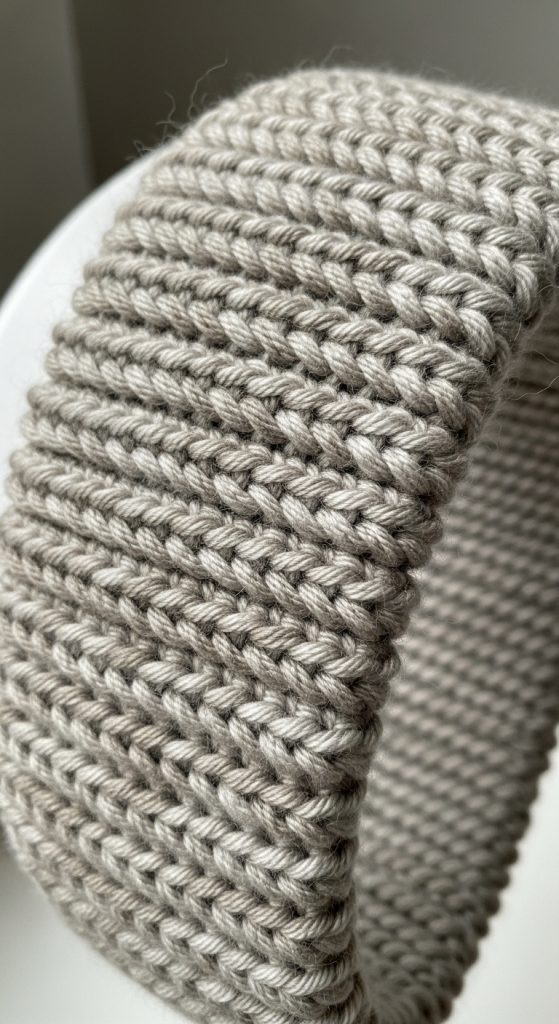
A ribbed crochet headband uses alternating stitches to create a textured surface. This design provides flexibility and stretch, making it comfortable for extended wear.
Use front and back loop stitches to create the ribbed effect. Crochet rows until the desired length is reached. Join the ends securely. This technique produces a structured and flexible headband.
Idea 4: Wide Winter Crochet Headband
Execution Process

A wide crochet headband is designed for colder conditions. It provides extra coverage and warmth while maintaining style.
Use thicker yarn and crochet multiple rows to increase width. Ensure even stitching for a consistent look. Join the ends securely. This design offers both functionality and comfort.
Idea 5: Bow Style Crochet Headband
How to Create

A bow-style headband includes a decorative element that enhances appearance. The bow adds a focal point while maintaining practicality.
Crochet a base band and create a separate bow piece. Attach the bow securely to the center. Ensure proper alignment. This method creates a visually appealing accessory.
Idea 6: Lacy Crochet Headband
Setup Method

A lacy crochet headband uses open stitch patterns to create a lightweight design. This style is suitable for warmer conditions.
Use chain spaces and open stitches to form the lace pattern. Maintain even spacing for consistency. Join the ends carefully. This design creates a delicate and breathable headband.
Idea 7: Buttoned Crochet Headband
How to Make
A buttoned headband includes a functional closure for easy adjustment. This design improves usability and fit.

Crochet the band and create a buttonhole at one end. Attach a button to the opposite end. Ensure secure placement. This method provides flexibility and convenience.
Idea 8: Double Crochet Headband
Step-by-Step Guide

A double crochet headband uses taller stitches to create a softer and more flexible texture. This design is quick to complete.
Work double crochet stitches across each row. Maintain consistent tension. Join the ends securely. This approach creates a lightweight and comfortable headband.
Idea 9: Textured Stitch Headband
How to Create

A textured crochet headband uses varied stitches to create depth and visual interest. This design adds complexity while remaining practical.
Combine different stitch types to form patterns. Maintain even spacing. Join the ends securely. This method creates a unique and detailed accessory.
Idea 10: Minimalist Slim Crochet Headband

Execution Process
A slim crochet headband focuses on simplicity and lightweight design. It is suitable for everyday use and minimalist style preferences.
Use fine yarn and basic stitches to create a narrow band. Maintain even tension throughout. Join the ends securely. This design creates a subtle and functional accessory.
Common Beginner Mistakes and How to Avoid Them
One common mistake is inconsistent tension, which affects the overall appearance and fit of the headband. Another issue is incorrect measurement, leading to a headband that is too tight or too loose. Skipping preparation steps can also result in uneven stitching. To avoid these problems, measure carefully and maintain consistent tension. Practice basic stitches before starting the project. Following a clear step by step process improves accuracy and results.
Practical Tips for Better Results
Use high-quality yarn to improve durability and appearance. Maintain even tension throughout the project. Use stitch markers to track progress. Follow a clear tutorial for guidance. These tips help achieve consistent and professional results.
Styling, Presentation, or Organization Ideas
Arrange headbands neatly for storage and display. Use coordinated colors to match outfits. Maintain clean finishes for better appearance. This approach enhances both functionality and aesthetic appeal.
Budget or Time Planning
Crochet headbands are cost-effective and quick to make. Use available materials to reduce expenses. Plan projects based on available time. This ensures efficient completion.
Creative Expansion and Advanced Inspiration
Experiment with different stitch patterns and color combinations. Add decorative elements such as beads or embroidery. Combine techniques to create unique designs. These ideas support continuous improvement and creativity.