10 hairstyle braids for school
Introduction
Braided hairstyles are a practical and structured way to manage hair for school while maintaining a clean and organized appearance. These styles are widely shared across Pinterest ideas because they combine functionality with aesthetic value. Students often need hairstyles that remain secure throughout the day, require minimal adjustments, and can be created quickly in the morning. Braids meet all of these requirements while offering a variety of creative ideas suitable for different hair lengths and textures.
This article explains ten beginner friendly braided hairstyles designed specifically for school settings. Each style includes a clear explanation and a step by step process, allowing easy replication without advanced skills. The focus remains on simple techniques, proper sectioning, and clean execution using basic materials. Readers will also learn how to prepare hair effectively, avoid common mistakes, and improve the final look through small adjustments. These hairstyles are suitable for daily wear, helping maintain neatness, reduce tangling, and support efficient morning routines.
Why This Idea Is Trending or Useful
Braided hairstyles continue to trend on Pinterest due to their balance between practicality and visual appeal. Students and parents search for easy project solutions that reduce daily effort while maintaining a polished look. Braids offer long-lasting hold, which makes them ideal for active school environments where hair must stay in place during classes and physical activities.
Another reason for their popularity is accessibility. Most braided styles require only basic materials such as combs, hair ties, and clips. This makes them suitable for budget ideas and DIY routines at home. Additionally, braided hairstyles align with modern design preferences by offering clean lines, symmetry, and a minimalist style. Many variations can be customized, allowing students to create a unique yet appropriate look for school.
The ability to adapt braids into different patterns also adds to their appeal. From simple three-strand braids to more detailed styles, each variation offers new inspiration. This flexibility makes braided hairstyles a reliable and creative project for daily school preparation.
Materials and Preparation
Before creating any braided hairstyle, proper preparation ensures a clean and long-lasting result. Start with detangled hair using a wide-tooth comb or brush. Smooth hair makes sectioning easier and prevents uneven braids. Lightly damp hair can improve control, especially for beginners, but avoid excessive moisture that may cause frizz later.
Basic materials include a fine-tooth comb for parting, elastic hair ties for securing braids, and clips to hold sections in place. For smoother finishes, a small amount of styling cream or water can help manage flyaways. These materials are simple and commonly available, making each style an accessible DIY tutorial.
Planning is also essential. Decide the number of braids, their placement, and symmetry before starting. Clean parting lines contribute to a neat appearance and improve the overall aesthetic. Ensure enough time is available to complete the hairstyle without rushing. Preparation reduces mistakes and helps maintain consistent results, especially when practicing new techniques.
Idea 1: Classic Three-Strand Side Braid

How to Create
The classic three-strand side braid is one of the most beginner friendly hairstyle braids for school. It involves dividing the hair into three equal sections and crossing them alternately to form a structured pattern. This style is ideal for maintaining control while keeping the hair away from the face. The side placement adds a slight variation to the traditional braid, creating a soft and balanced appearance suitable for everyday school wear.
To create this style, start by brushing the hair thoroughly and gathering it over one shoulder. Divide the hair into three equal parts. Cross the right section over the middle, then the left section over the new middle strand. Continue this pattern consistently until reaching the ends. Secure the braid with an elastic band. Ensure the tension remains even throughout to avoid loose or uneven sections. Adjust the braid slightly by pulling the edges for a fuller look if desired. This step by step method ensures a clean and stable result that lasts throughout the school day.
Idea 2: Double French Braids
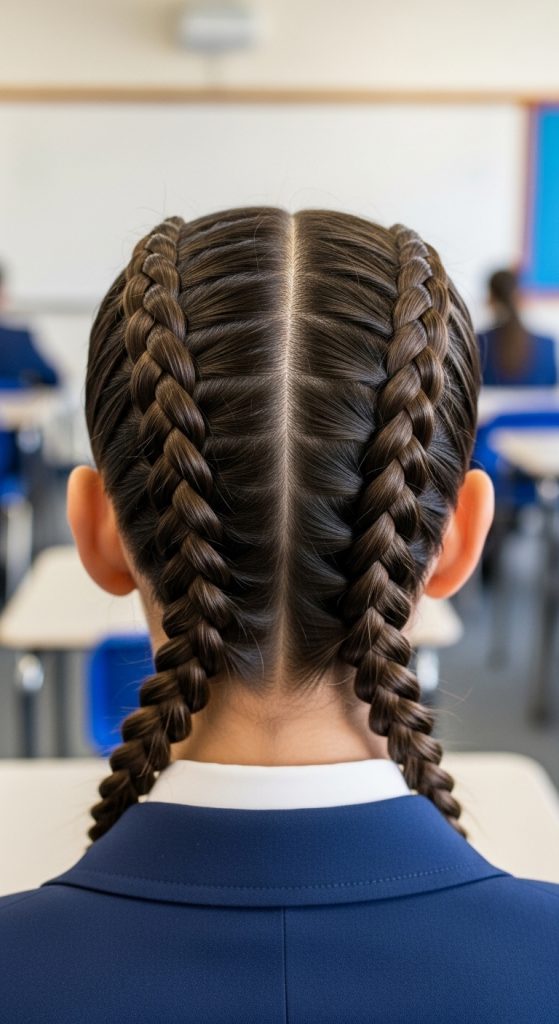
Step-by-Step Guide
Double French braids are a structured and secure hairstyle that keeps hair neatly in place. This style involves two braids created close to the scalp, making it ideal for active school days. The technique includes gradually adding hair into each braid as it progresses downward. This creates a tight and uniform appearance that reduces the need for adjustments throughout the day.
Begin by parting the hair down the center using a comb. Clip one side to keep sections separate. On the first side, take a small section near the hairline and divide it into three strands. Start braiding while adding small portions of hair from each side into the braid. Continue this process until reaching the nape of the neck, then complete the remaining length as a regular braid. Secure with an elastic. Repeat on the other side. Ensure both braids are symmetrical for a balanced look. This method provides a clean, durable hairstyle that fits both casual and structured school settings.
Idea 3: Low Braided Ponytail
How to Make
The low braided ponytail combines simplicity with structure, making it a practical choice for school routines. This hairstyle starts with a low ponytail, which is then braided to create a neat and controlled finish. It works well for medium to long hair and is suitable for beginners due to its straightforward process.
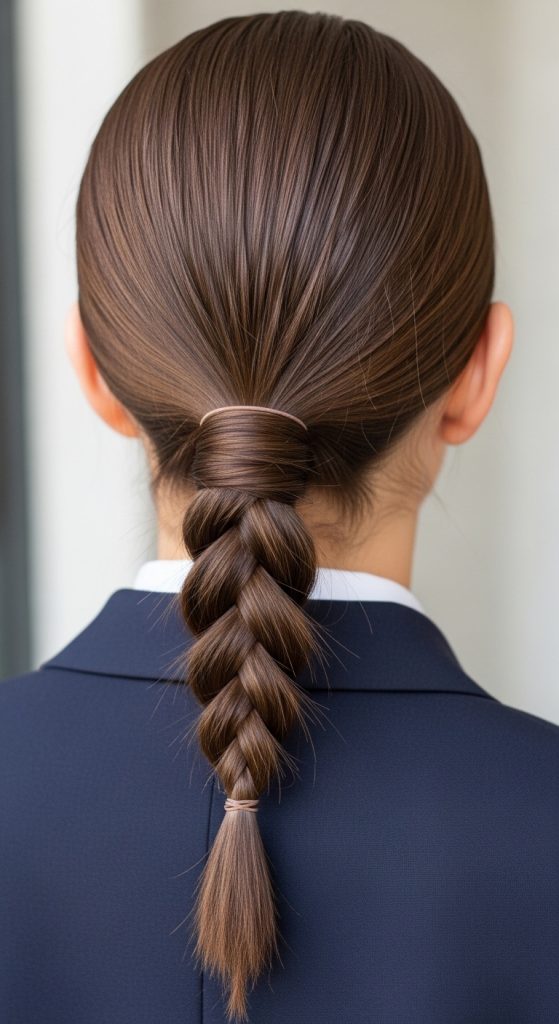
Start by brushing the hair and gathering it at the nape of the neck. Secure it into a low ponytail using an elastic band. Divide the ponytail into three sections and create a standard braid by crossing strands alternately. Continue until reaching the ends and secure with another elastic. Ensure the braid remains tight to maintain its shape throughout the day. This style reduces loose strands and helps maintain organization. It is also adaptable, allowing slight variations in placement or tightness to suit individual preferences.
Idea 4: Half-Up Braided Style
Execution Process

The half-up braided style combines loose hair with a structured braid, creating a balanced and functional hairstyle. This design keeps the front sections secured while allowing the rest of the hair to flow naturally. It is a popular Pinterest idea due to its versatility and neat appearance.
To create this style, section off the top half of the hair from ear to ear. Divide this section into three strands and create a braid, either centered or slightly off to one side. Secure the braid with an elastic. Leave the remaining hair loose. For better results, ensure the top section is smooth before braiding. This style works well for students who prefer a combination of structure and softness. It is quick to complete and requires minimal materials, making it an efficient and beginner friendly option.
Idea 5: Crown Braid

How to Create
The crown braid forms a circular pattern around the head, creating a secure and elegant look suitable for school. This style involves wrapping a braid along the hairline, which helps keep hair fully controlled. It is a practical option for longer hair and provides a neat, all-day hold.
Start by parting the hair to one side. Begin braiding near the front hairline using a French braid technique, gradually adding hair as you move around the head. Continue the braid along the perimeter until reaching the starting point. Secure the end and tuck it under the braid using clips. Ensure even tension throughout the process to maintain consistency. This hairstyle may require practice but becomes easier with repetition. It offers both structure and durability, making it a reliable option for school environments.
Idea 6: Fishtail Braid
Step-by-Step Guide
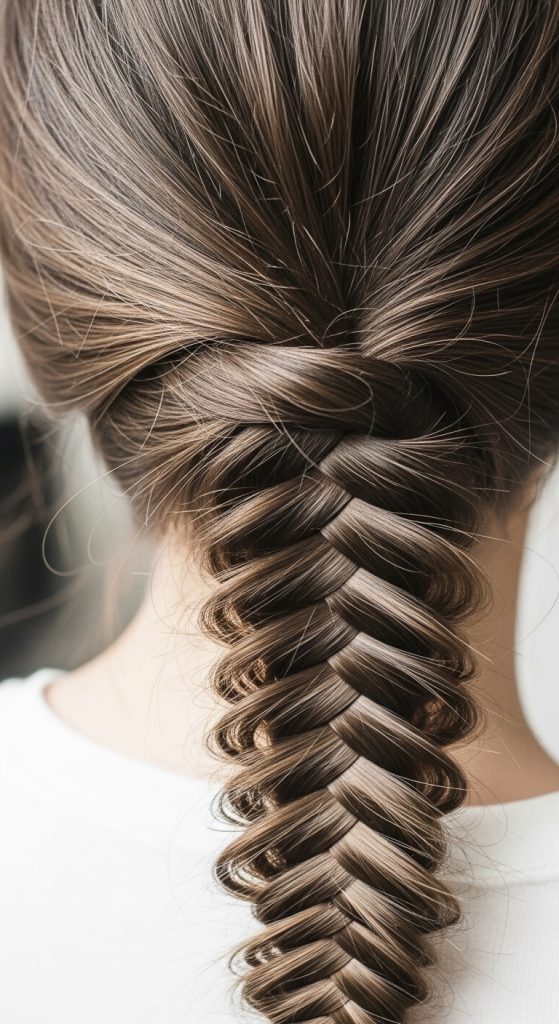
The fishtail braid creates a detailed pattern using two sections instead of three. This technique produces a textured appearance while remaining secure and functional for school use. It is suitable for students who want a slightly different braid style without adding complexity.
Divide the hair into two equal sections. Take a small strand from the outer edge of one section and cross it over to the opposite section. Repeat this process on the other side, alternating consistently. Continue until reaching the ends and secure with an elastic. Keep sections small for a tighter and more defined pattern. This braid requires attention to detail but remains manageable with practice. It offers a unique visual effect while maintaining practicality.
Idea 7: Braided Bun

How to Make
The braided bun combines a braid with a compact bun, creating a secure and tidy hairstyle. This design is useful for keeping hair fully contained, especially during long school hours. It also reduces tangling and maintains organization.
Begin by creating a ponytail at the desired height. Braid the ponytail using a standard three-strand method. Once complete, wrap the braid around the base of the ponytail to form a bun. Secure it with pins or an elastic. Ensure the bun is tight enough to hold its shape throughout the day. This style is efficient and works well for both short and long hair when adjusted properly.
Idea 8: Rope Braid
Execution Process
The rope braid is created by twisting two sections of hair and wrapping them around each other. This method produces a clean and modern design while remaining simple to execute. It is a suitable option for beginners seeking an alternative to traditional braids.

Divide the hair into two sections. Twist each section in the same direction, then wrap them together in the opposite direction. Continue this pattern until reaching the ends and secure with an elastic. Maintain consistent tension to prevent unraveling. This style is quick to create and holds well when properly secured. It is an efficient choice for daily school routines.
Idea 9: Side Dutch Braid
Step-by-Step Guide

The side Dutch braid is similar to a French braid but uses an underhand technique, creating a raised braid effect. This style adds dimension while keeping hair secure. It is practical for school and offers a structured appearance.
Start by gathering hair to one side. Divide a section near the front into three parts. Cross the outer strands under the middle strand while adding hair gradually. Continue this pattern along the side of the head until reaching the ends. Secure with an elastic. Ensure even sections to maintain symmetry. This braid provides a defined look and stays in place throughout the day.
Idea 10: Braided Pigtails
How to Create
Braided pigtails involve dividing the hair into two equal sections and braiding each side separately. This style is simple, balanced, and suitable for younger students or quick routines. It keeps hair organized and evenly distributed.

Part the hair down the center and secure one side temporarily. Divide the first side into three strands and braid downward, securing with an elastic. Repeat on the other side. Ensure both braids are equal in size and tension. This style is easy to maintain and works well for active school schedules.
Common Beginner Mistakes and How to Avoid Them
One common mistake is uneven sectioning, which leads to inconsistent braid patterns. Using a comb to create clean parts helps maintain symmetry. Another issue is inconsistent tension, which can cause braids to loosen or become uncomfortable. Maintaining steady pressure while braiding ensures a balanced result. Skipping preparation, such as detangling hair, often results in messy braids and difficulty during the process. Taking time to prepare improves the final outcome.
Beginners may also rush through steps, leading to uneven finishes. Working slowly and following a clear step by step method reduces errors. Using too many products can weigh down hair, while using none may lead to frizz. Applying minimal product ensures control without stiffness.
Practical Tips for Better Results
Consistent practice improves braiding techniques over time. Starting with simple styles and gradually progressing to more complex ones builds confidence. Using mirrors to check symmetry helps maintain balance. Keeping tools organized before starting reduces interruptions.
Working with slightly damp hair can improve control and reduce flyaways. Securing braids properly ensures they last throughout the day. Small adjustments, such as tightening loose sections, enhance the final look. These tips support better execution and more consistent results.
Styling, Presentation, or Organization Ideas
Braided hairstyles can be styled in various ways to suit personal preferences while maintaining a school-appropriate look. Keeping part lines straight enhances the overall appearance. Adjusting braid thickness or placement can create subtle variations without changing the entire style.
Organizing tools in advance helps maintain efficiency. Presenting the hairstyle neatly by smoothing edges and securing loose strands improves the final result. Consistency in styling contributes to a polished and structured appearance.
Budget or Time Planning
Most braided hairstyles require minimal materials, making them cost-effective. Basic tools such as combs and elastics are sufficient for most styles. Planning hairstyles in advance reduces morning preparation time.
Practicing styles during free time helps improve speed and efficiency. Choosing simpler braids for busy days ensures consistency without requiring extra effort. Time management plays a key role in maintaining daily routines.
Creative Expansion and Advanced Inspiration
Once basic braiding techniques are mastered, variations can be introduced. Combining multiple braid styles creates more detailed designs. Adjusting placement or adding patterns enhances creativity.
Exploring new Pinterest ideas provides continuous inspiration. Advanced styles can be developed by combining techniques such as French and fishtail braids. This allows gradual progression while maintaining practicality for school use.


